One of my best early memories is seeing parents firing up a portable grill in the middle of a campsite at the end of an adventurous day and smelling those those sizzling flavors.
Some people don’t put hald as much thought on their camping meals as they do on their camping adventures, but camping food does not have to mean soggy sandwiches and burnt hot dogs. There is plenty of delicious meals to be made with the right tools and a few killer recipes.
In this post I will be sharing all of my best tips!
Grill Camping Dishes Essential Tools
Grilling at the campsite takes your outdoor cooking game to the next level but you need the right gear to make it happen.
These essential tools will help you create amazing grilled meals that taste better than anything you’d make at home.
- Portable Camping Grill
The foundation for all your grilling adventures that folds up compact for easy transport.
- Long-Handle Grilling Tools
Keep your hands safely away from the heat while flipping burgers and moving food around.
- Heavy-Duty Grill Grates
Give you those perfect grill marks and prevent smaller foods from falling through.
- Heat-Resistant Gloves
Protect your hands when handling hot grates, moving coals or adjusting your setup.
- Heavy-Duty Aluminum Foil
Perfect for making foil packets, covering food and keeping your grill grates clean.
- Quality Cooler with Ice Packs
Keeps your meat, vegetables and other ingredients fresh and safe until it’s time to grill.
Grilling Camping Meal Ideas
Now that you’ve got your grilling gear sorted out, let’s talk about the fun part… the actual meals your gonna make!
These crowd-pleasers are perfect for camping trips, they’ll have everyone gathered around your campfire grill like moths to a flame.
From veggie-packed foil packets that practically cook themselves to delicious salmon recipe, these recipes are guaranteed to turn your campsite into the neighborhood’s most popular dinner spot.
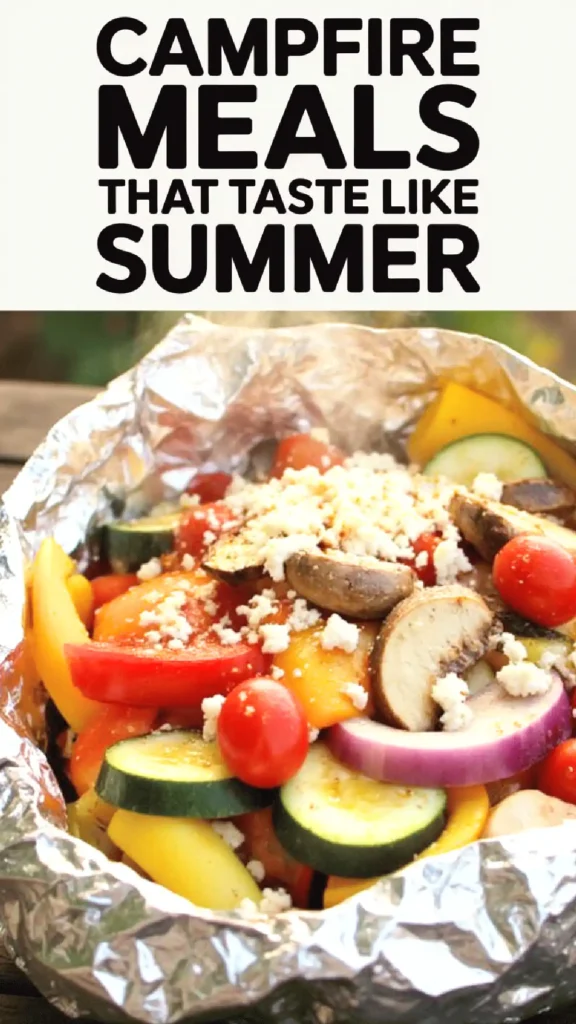
Foil Packet Veggie Medley
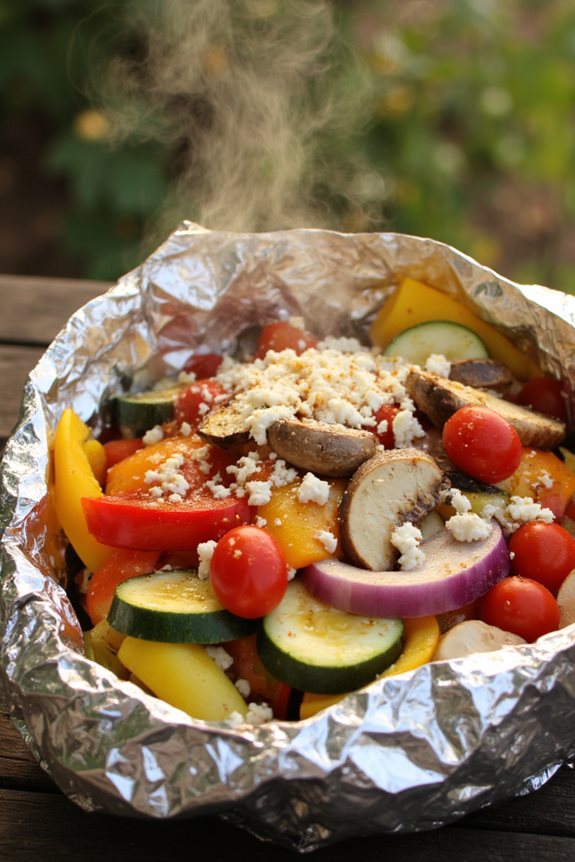
The vegetables steam perfectly in their own juices while getting those amazing smoky flavors from the grill, plus you can customize each packet for different tastes… which is super handy when your camping buddy thinks mushrooms are from another planet.
Ingredients:
- 2 zucchini, sliced into rounds
- 1 bell pepper (any color), cut into strips
- 1 red onion, sliced
- 8 oz mushrooms, halved
- 2 cups cherry tomatoes
- 3 tablespoons olive oil
- 2 cloves garlic, minced
- 1 teaspoon dried herbs (like Italian seasoning or thyme)
- Salt and pepper to taste
- Heavy-duty aluminum foil
- Optional: crumbled feta or goat cheese
Instructions:
- Cut four large pieces of heavy-duty foil, about 12 inches each. You want them big enough to wrap everything up without the veggies escaping.
- In a large bowl, toss all the vegetables with olive oil, minced garlic, herbs, salt and pepper until everything’s nicely coated.
- Divide the veggie mixture evenly among the four foil pieces, placing them in the center of each sheet.
- Fold the foil over the vegetables and crimp the edges tightly to create sealed packets. Make sure there’s no gaps or your delicious juices will leak out!
- Place the packets on the grill over medium heat and cook for 15-20 minutes, flipping once halfway through.
- Carefully open one packet to check if the veggies are tender. If they need more time, seal it back up and give them another 5 minutes.
- Open the packets carefully because the steam will be hot, sprinkle with cheese if you’re using it, and serve right from the foil for that authentic camping vibe.
Grilled Campfire Chicken Skewers

They’re super easy to prep ahead of time, cook evenly on the grill grate, and there’s minimal cleanup which means more time for s’mores later.
Ingredients:
- 2 lbs boneless chicken breast or thighs, cut into 1-inch cubes
- 2 bell peppers (any colors), cut into chunks
- 1 large red onion, cut into chunks
- 2 zucchini, sliced into thick rounds
- 1/4 cup olive oil
- 3 tablespoons soy sauce
- 2 tablespoons honey
- 3 cloves garlic, minced
- 1 teaspoon paprika
- 1 teaspoon dried oregano
- Salt and black pepper to taste
- Metal or wooden skewers (soak wooden ones for 30 minutes)
Instructions:
- Mix the olive oil, soy sauce, honey, minced garlic, paprika, oregano, salt and pepper in a large bowl to create your marinade.
- Add the chicken cubes to the marinade and toss until everything’s well coated. Let it marinate for at least 30 minutes, but longer is definitely better if you got the time.
- Thread the marinated chicken and vegetables onto your skewers, alternating between chicken and veggies for the best cooking results.
- Get your campfire going and let it burn down to hot coals, or set up your camp grill over the fire.
- Place the skewers on the grill grate about 4-6 inches above the coals.
- Cook for 12-15 minutes total, turning every 3-4 minutes to get that perfect char on all sides.
- Check that the chicken’s cooked through by cutting into a piece… it should be white all the way through with no pink spots.
- Let them rest for a couple minutes before serving because nobody wants to burn their tongue on the first night of camping!
Grilled Corn With Herb Butter
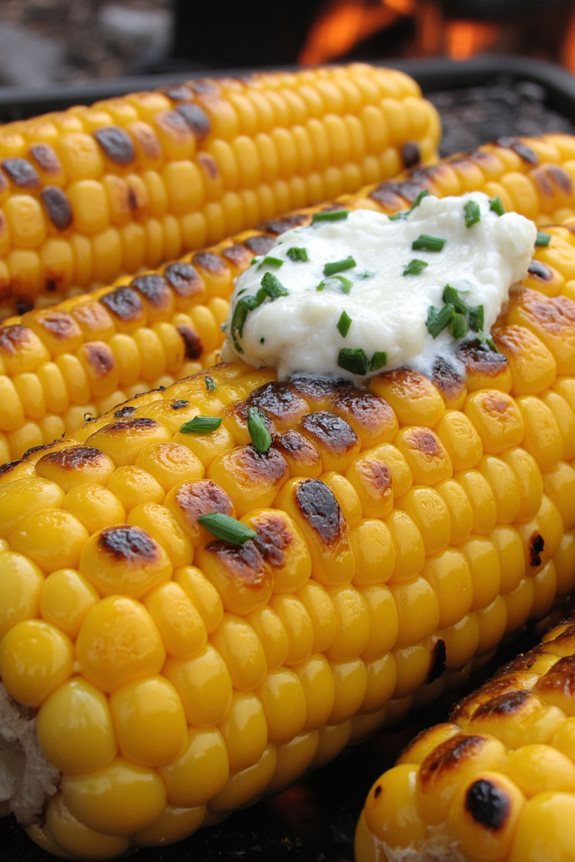
The grill gives the corn that amazing smoky flavor you just can’t get indoors, and the herb butter melts into every kernel creating this incredible combination that’ll have everyone asking for seconds.
Ingredients:
- 6 ears of corn, husks removed
- 1/2 cup butter, softened
- 2 tablespoons fresh parsley, chopped
- 1 tablespoon fresh chives, chopped
- 1 teaspoon garlic powder
- 1/2 teaspoon salt
- 1/4 teaspoon black pepper
- 2 tablespoons olive oil
- Aluminum foil (optional)
Instructions:
- Mix the softened butter, parsley, chives, garlic powder, salt and pepper in a small bowl until everything’s well combined. Set this herb butter aside.
- Brush each ear of corn with olive oil to prevent sticking and help with that beautiful golden color.
- Preheat your grill to medium-high heat, around 400°F if you’ve got a thermometer.
- Place the corn directly on the grill grates and cook for 10-15 minutes, turning every 3-4 minutes so all sides get evenly charred.
- You’ll know it’s done when the kernels are tender and have those gorgeous grill marks that make everything taste better.
- Remove from grill and immediately slather each ear with the herb butter while the corn’s still hot so it melts perfectly.
- Serve right away because this is one of those dishes that’s best enjoyed piping hot around the campfire.
Grilled Salmon Cedar Planks
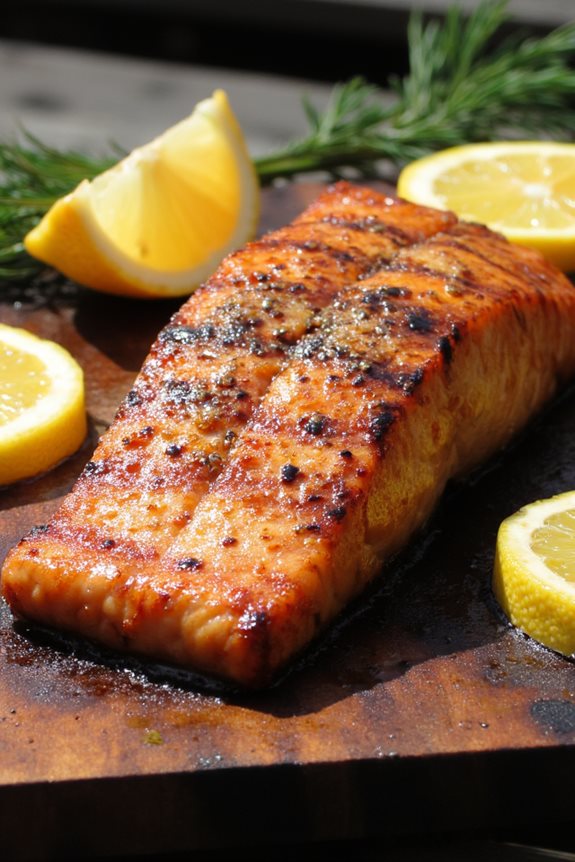
It’s surprisingly simple to make and always impresses fellow campers… plus the plank acts as both your cooking surface and serving platter, which means less cleanup after your outdoor feast.
Ingredients:
- 2 cedar planks (soaked in water for at least 2 hours)
- 4 salmon fillets (6 oz each)
- 3 tablespoons olive oil
- 2 tablespoons brown sugar
- 1 tablespoon Dijon mustard
- 2 teaspoons smoked paprika
- 1 teaspoon garlic powder
- 1 teaspoon salt
- 1/2 teaspoon black pepper
- 2 lemons, sliced
- Fresh dill for garnish
Instructions:
- Soak your cedar planks in water for at least 2 hours before grilling, this prevents them from catching fire and creates that perfect steam.
- Preheat your camp grill to medium-high heat, around 400°F if you got a thermometer handy.
- Mix together olive oil, brown sugar, Dijon mustard, smoked paprika, garlic powder, salt and pepper in a small bowl to create your glaze.
- Pat the salmon fillets dry with paper towels and brush both sides generously with the glaze mixture.
- Place the soaked cedar planks on the grill for about 3 minutes to get them heated up and slightly charred.
- Carefully flip the planks and immediately place the glazed salmon fillets on top, then arrange lemon slices around the fish.
- Close the grill lid and cook for 12-15 minutes until the salmon flakes easily with a fork and reaches an internal temperature of 145°F.
- Remove the entire plank from the grill using tongs and let it rest for 2-3 minutes before garnishing with fresh dill and serving directly from the plank.
Grilled Pineapple Dessert Pizza
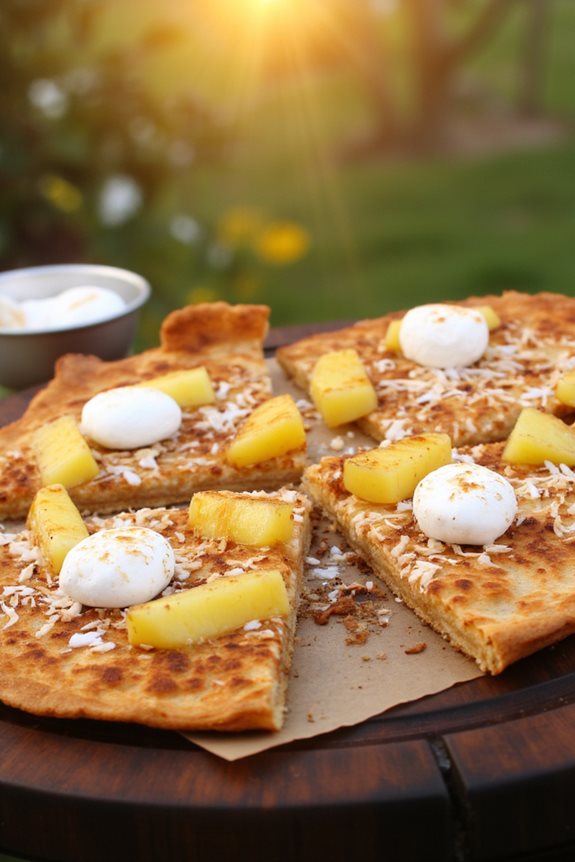
It’s basically like having a tropical vacation on a tortilla, and the best part is you can make it right on your camp grill without any fancy equipment.
Ingredients:
- 4 large flour tortillas
- 1 fresh pineapple, cored and sliced into rings
- 8 oz cream cheese, softened
- 1/4 cup powdered sugar
- 1 teaspoon vanilla extract
- 1/2 cup mini marshmallows
- 1/4 cup chopped toasted coconut
- 2 tablespoons honey
- 1/4 cup chopped macadamia nuts (optional)
- Cooking spray or oil for grill
Instructions:
- Heat your camp grill to medium heat and lightly oil the grates so nothing sticks like glue.
- Grill the pineapple rings for about 3-4 minutes per side until they get those beautiful caramelized grill marks that make everything look professional.
- While the pineapple’s doing its thing, mix together the softened cream cheese, powdered sugar and vanilla in a bowl until it’s smooth and dreamy.
- Remove pineapple from grill and chop it into bite-sized pieces, but don’t worry about making them perfect because rustic looks better anyway.
- Spread the cream cheese mixture evenly over each tortilla, leaving about a half-inch border around the edges.
- Sprinkle the grilled pineapple pieces, mini marshmallows and toasted coconut over the cream cheese base.
- Carefully place the tortillas on the grill and cook for 2-3 minutes until the bottom gets crispy and the marshmallows start getting all golden and puffy.
- Remove from grill, drizzle with honey, add macadamia nuts if you’re using them, and slice into wedges while everyone gathers around like moths to a flame.
Grilled Stuffed Bell Peppers
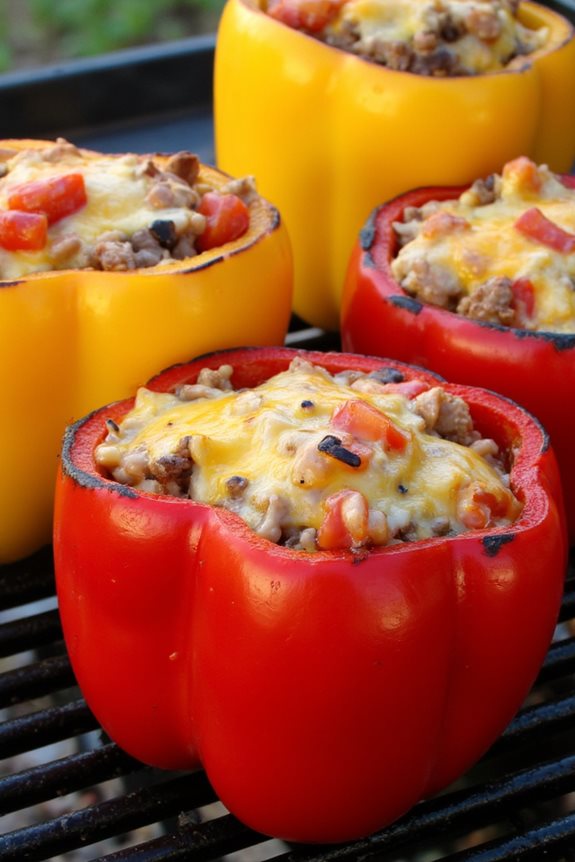
They’re filling enough to be a complete meal and you can prep most of the stuffing ahead of time.
Ingredients:
- 4 large bell peppers (any color), tops cut off and seeds removed
- 1 pound ground beef or turkey
- 1 cup cooked rice
- 1 small onion, diced
- 2 cloves garlic, minced
- 1 can diced tomatoes, drained
- 1 cup shredded cheese (cheddar or mozzarella work great)
- 2 tablespoons olive oil
- 1 teaspoon dried oregano
- 1 teaspoon salt
- 1/2 teaspoon black pepper
- Aluminum foil
Instructions:
- Preheat your grill to medium heat and get those coals nice and even if you’re using charcoal.
- Heat olive oil in a camp skillet or pan over the grill. Cook the diced onion until it’s soft and smells amazing, about 5 minutes.
- Add the minced garlic and ground meat, cooking until the meat is browned and cooked through. Break it up with your spatula as it cooks.
- Stir in the cooked rice, drained tomatoes, oregano, salt and pepper. Mix everything together and let it cook for another 3-4 minutes.
- Remove from heat and stir in half of the shredded cheese. This is your stuffing and it should smell incredible right about now!
- Stuff each bell pepper with the meat and rice mixture, packing it down gently but don’t go crazy or you’ll split the pepper.
- Top each stuffed pepper with the remaining cheese and wrap the bottom half of each pepper in aluminum foil to prevent burning.
- Place the peppers on the grill, cover with the grill lid, and cook for 20-25 minutes until the peppers are tender and the cheese is melted and bubbly.
- Let them cool for a few minutes before serving because that cheese will be molten lava hot!
Grilled Sausage Pepper Sandwiches
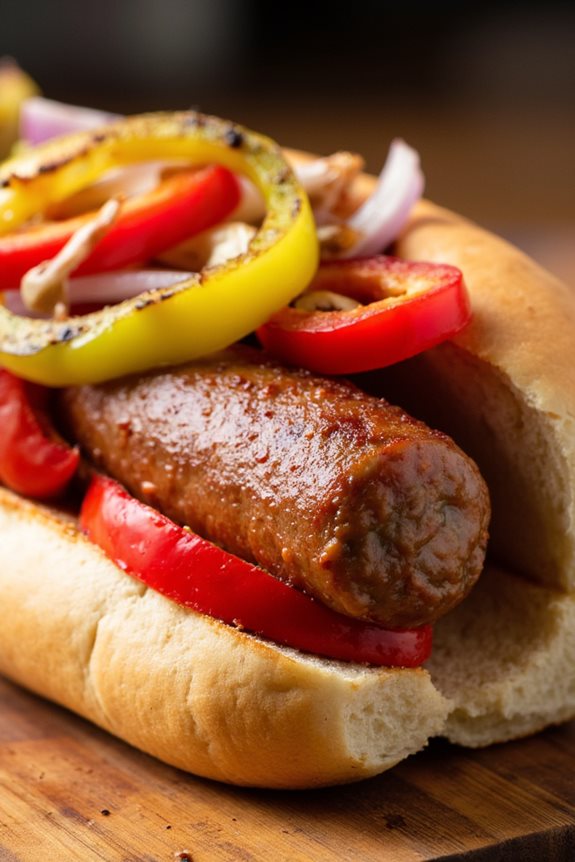
The smoky char from the grill makes those peppers and sausages taste absolutely incredible, plus you can prep everything in foil packets which means less mess and more time enjoying the great outdoors.
Ingredients:
- 4 Italian sausages (sweet or spicy, your choice)
- 2 large bell peppers, sliced into strips
- 1 large onion, sliced
- 4 hoagie rolls or sub buns
- 2 tablespoons olive oil
- 1 teaspoon garlic powder
- 1 teaspoon Italian seasoning
- Salt and pepper to taste
- Provolone or mozzarella cheese slices (optional but totally worth it)
- Mustard or marinara sauce for serving
Instructions:
- Fire up your grill to medium heat and let it get nice and hot while you prep everything.
- Toss the sliced peppers and onions with olive oil, garlic powder, Italian seasoning, salt and pepper in a large bowl until they’re well coated.
- Create foil packets by placing the seasoned veggies on large pieces of heavy-duty foil, then seal them up tight so no juices escape.
- Place the sausages and foil packets on the grill. Cook the sausages for about 12-15 minutes, turning them every few minutes until they’re nicely browned and cooked through.
- The veggie packets will take about the same time, maybe give them a flip halfway through if you’re feeling fancy.
- During the last few minutes, slice your rolls in half and toast them cut-side down on the grill until they’re golden and slightly crispy.
- Remove everything from the grill and let it cool for just a minute because nobody wants to burn their tongue on molten pepper juice!
- Slice the sausages lengthwise if they’re too thick for the rolls, then pile them into the toasted buns with the grilled peppers and onions.
- Add cheese if you’re using it, and top with your favorite mustard or marinara sauce before serving.
Grilled Bacon-Wrapped Shrimp
This Grilled Bacon-Wrapped Shrimp is fancy enough to impress your camping buddies but simple enough that you won’t stress about messing it up… because let’s be honest, bacon makes everything better anyway!
Ingredients:
- 1 pound large shrimp, peeled and deveined
- 8-10 strips bacon, cut in half
- 2 tablespoons olive oil
- 2 cloves garlic, minced
- 1 teaspoon paprika
- 1/2 teaspoon black pepper
- 1/4 teaspoon cayenne pepper (optional)
- 1 lemon, cut into wedges
- Wooden toothpicks, soaked in water
Instructions:
- Soak your toothpicks in water for at least 30 minutes so they don’t turn into tiny torches on the grill.
- Pat the shrimp dry with paper towels and toss them in a bowl with olive oil, minced garlic, paprika, black pepper and cayenne if you’re feeling spicy.
- Wrap each seasoned shrimp with half a strip of bacon and secure it with a soaked toothpick.
- Preheat your camping grill to medium-high heat and make sure the grates are clean.
- Grill the bacon-wrapped shrimp for 2-3 minutes per side until the bacon is crispy and the shrimp turns pink and opaque.
- Remove from grill and squeeze fresh lemon juice over the top before serving immediately while they’re still sizzling hot.
Grilled Peach Cobbler Packets
It’s way easier than trying to balance a real cobbler over flames, and everyone gets their own portion so there’s no fighting over the last scoop… well, maybe just a little friendly competition for seconds!
Ingredients:
- 4 large peaches, sliced
- 1/2 cup brown sugar
- 1 teaspoon cinnamon
- 1/4 teaspoon nutmeg
- 1 tablespoon cornstarch
- 1 tube refrigerated biscuit dough
- 4 tablespoons butter, cubed
- 2 tablespoons honey
- Vanilla ice cream for serving
- Heavy-duty aluminum foil
Instructions:
- Cut four large squares of heavy-duty foil and spray each one with cooking spray to prevent sticking.
- In a bowl, toss the sliced peaches with brown sugar, cinnamon, nutmeg and cornstarch until everything’s nicely coated.
- Divide the peach mixture evenly between the four foil squares, placing it in the center of each piece.
- Tear each biscuit into 3-4 smaller pieces and scatter them over the peaches like little fluffy clouds.
- Drizzle honey over each packet and dot with butter cubes for that extra richness.
- Fold the foil up and over the filling, sealing the edges tightly to create secure packets that won’t leak.
- Place packets on the grill over medium heat for 15-20 minutes, flipping once halfway through cooking.
- Carefully open one packet to check if peaches are tender and biscuits are cooked through before removing from heat.
- Let cool for a few minutes before opening completely, then serve with a scoop of vanilla ice cream on top.
Grilled Marinated Steak Fajitas
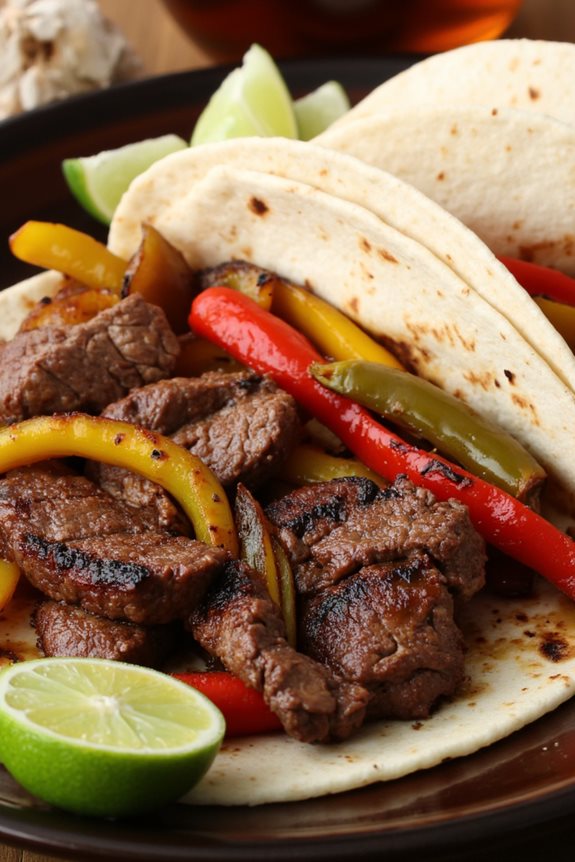
Everyone loves the interactive fun of building their own fajitas around the campfire… it’s like a delicious hands-on activity that brings everyone together.
Ingredients:
- 2 pounds flank steak or skirt steak
- 1/4 cup lime juice (about 2-3 limes)
- 1/4 cup olive oil
- 3 cloves garlic, minced
- 2 teaspoons chili powder
- 1 teaspoon cumin
- 1 teaspoon paprika
- 1/2 teaspoon oregano
- Salt and pepper to taste
- 3 bell peppers (mixed colors), sliced
- 2 large onions, sliced
- 8-10 flour tortillas
- Optional toppings: shredded cheese, sour cream, salsa, guacamole
Instructions:
- Mix the lime juice, olive oil, minced garlic, chili powder, cumin, paprika, oregano, salt and pepper in a large ziplock bag to create your marinade.
- Add the steak to the bag, seal it tight and massage the marinade all over the meat. Let it marinate for at least 30 minutes, but ideally 2-4 hours if you have the time.
- Preheat your camping grill to medium-high heat and oil the grates so nothing sticks.
- Remove the steak from the marinade and grill for about 4-6 minutes per side for medium-rare, depending on thickness. Don’t be that person who keeps flipping it… let it develop those beautiful grill marks!
- While the steak rests for 5 minutes, toss the sliced peppers and onions on the grill. Cook them for about 8-10 minutes until they’re tender and slightly charred.
- Slice the steak against the grain into thin strips, which makes it way more tender and easier to chew.
- Warm the tortillas on the grill for about 30 seconds per side, then serve everything family-style so everyone can build their perfect fajita masterpiece.
Grilled Stuffed Zucchini Boats
Zucchinis are little canoes waiting to be filled with some delicious goodness.
Ingredients:
- 4 medium zucchini, halved lengthwise
- 1 cup cooked rice or quinoa
- 1/2 cup diced tomatoes
- 1/2 cup shredded cheese (cheddar or mozzarella work great)
- 1/4 cup diced onion
- 2 cloves garlic, minced
- 2 tablespoons olive oil
- 1 teaspoon Italian seasoning
- Salt and pepper to taste
- Optional: cooked ground meat or chopped mushrooms
Instructions:
- Preheat your camping grill to medium heat and lightly oil the grates to prevent sticking.
- Scoop out the center flesh of each zucchini half with a spoon, leaving about 1/4 inch of flesh around the edges to create your “boats.”
- Chop up the scooped zucchini flesh and mix it with the cooked rice, diced tomatoes, onion, garlic, Italian seasoning, salt and pepper in a bowl.
- Brush the zucchini boats with olive oil and season with a pinch of salt and pepper.
- Fill each zucchini boat with the rice mixture and top with shredded cheese.
- Place the stuffed zucchini on the grill and close the lid. Cook for 15-20 minutes until the zucchini is tender and the cheese is melted and bubbly.
- Let them cool for a few minutes before serving because that cheese is gonna be lava hot!
Grill camping meals
Grilling while camping is one of the best ways to end a fun-filled day. You’ve got amazing meal ideas now that’ll make your taste buds do a happy dance.
From those bacon-wrapped shrimp to sweet packets… there is something for everyone in this list!
So fire up that portable grill, grab your favorite ingredients and get ready to create some seriously delicious memories under the stars!